


SIPp web frontend
SIPp web frontend 1.2 reference documentation
Description
With SIPp web frontend you can
- upload XML templates (SIPp scenarios) and CSV injection files
- create and modify test processes using these files
- manage test versions
- run created test processes
- display realtime feedback during test runs
- store created test information in a database
Terms and definitions
- Scenario
A user can upload XML files containing SIP call flows, named scenario files. Optionally, one can upload a CSV field injection file. These files are stored along with a scenario name and a description. There are also some standard scenarios, that cannot be modified (from the command line parameter -sn, e.g., uac, uas, regexp, ...) - Call
A call consists of all information necessary to run one instance of SIPp. Thus a SIPp executable, a scenario, and a collection of parameters (e.g., destination ip-address). - Call sequence
In some test scenarios it is not enough to run only one call. For example in a first call SIP user agents get registered at a SIP proxy, in a second call those user agents communicate with a server, and in a last call the registrations are removed again. Thus a call sequence is an ordered list of calls, that can be executed automatically one by one. - Call sequence pair / call parties
SIPp webfrontend has the capability to execute two calls in a test simultaneously. This is useful for example if you want to simulate a server and a client communicating with each other. In this case two call sequences can be defined each in a separate party (A party and B party). - Test
A test can be a call, a call sequence or a call sequence pair. There also may be several versions of a test that can be executed. - Run
After a test has been executed, collected information (e.g., about the progress, test parameters, date and time, log files...) is stored as a run for further processing.
Admin guide
Installation instructions
For detailed installation instructions refer to the file INSTALL.TXT shipped with the SIPp webfrontend package.
Login
In order to act as an admin, you first need to login to the admin section by entering the correct password, defined in the config file config.ini.php with the parameter admin_pwd. If you want everybody to be admin, assign admin_pwd an empty password (admin_pwd="").
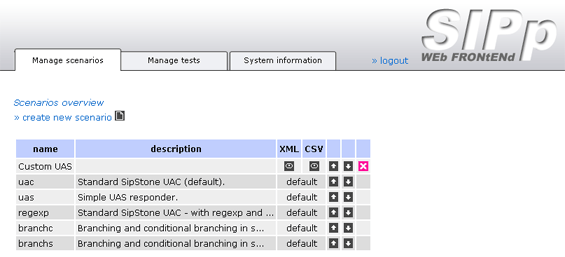
Manage scenarios
There is a list of scenarios available for creating tests in the manage scenarios tab. Scenarios tagged with the word default are SIPp default scenarios, and cannot be modified or removed. Change the order of the scenarios by using the arrow up and the arrow down buttons, or remove a scenario by pressing the red X button. To modify a scenario, just click the row of the scenario, and to create a new scenario use the create new scenario link.
Create / modify a scenario
To create a scenario, a name has to be specified and a XML scenario file has to be given (upload the file by pressing the corresponding Browse... button). Optionally the user can enter a description, upload a CSV injection file and enter a bind_local ip address to instruct a server to listen only to the given address instead to all available (see sipp -h for more details).
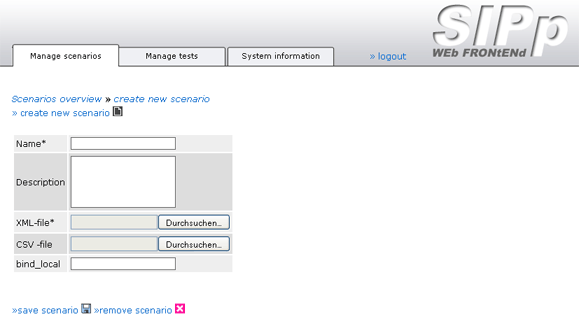
After you have created a scenario, you can modify it any time if you want. You can even remove a CSV file or replace the XML file.
Manage tests
Open the Manage tests tab to get a list of available tests.
- to completely delete a test press the red X button
- to modify a test, click on the corresponding table row
- to create a new test, use the create new test link
For more information about this window see section Manage tests in the User guide.
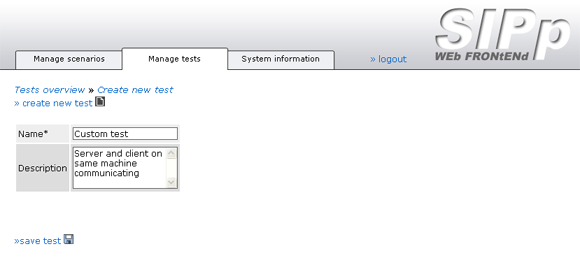
Create a test
To create a test
- enter a test title into the name field
- optionally enter a test description into the description field
- click on the save test link
After an empty test is created, it is in its version 1. Now calls can be added. A call is an instruction to SIPp, so a test is an instruction set. There are two parties the calls can be added, the A party and the B party. The calls in a party are executed one by one like in a queue, but the two parties are executed simultaneously. With this the parties can communicate with each other.
Sometimes the A party and the B party should not begin the execution at the same time (e.g., the client waits for the server to start). In this case a party can be delayed using the corresponding delay dropdown field.
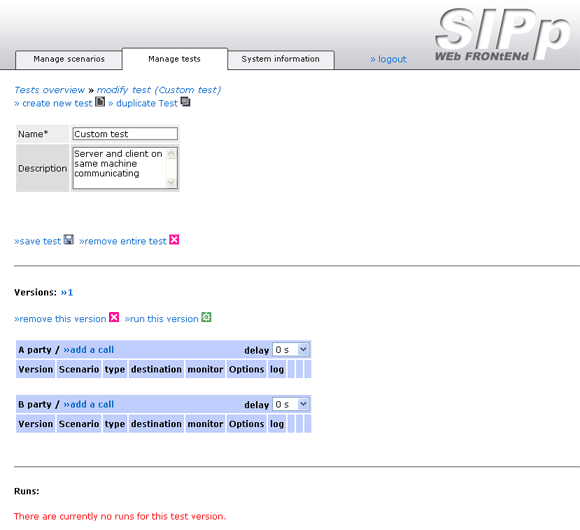
The test screen is split in 3 areas. In the first (upper) one, the test name and description can be modified, and the entire test can be duplicated or removed. In the second (middle) area calls can be added, removed or reordered. The third (lower) area shows the test-runs that has been done with the current version.
Adding calls to a test
To add a call, use the add a call link of the corresponding party (see in the figure above) and get to the Create new call screen.
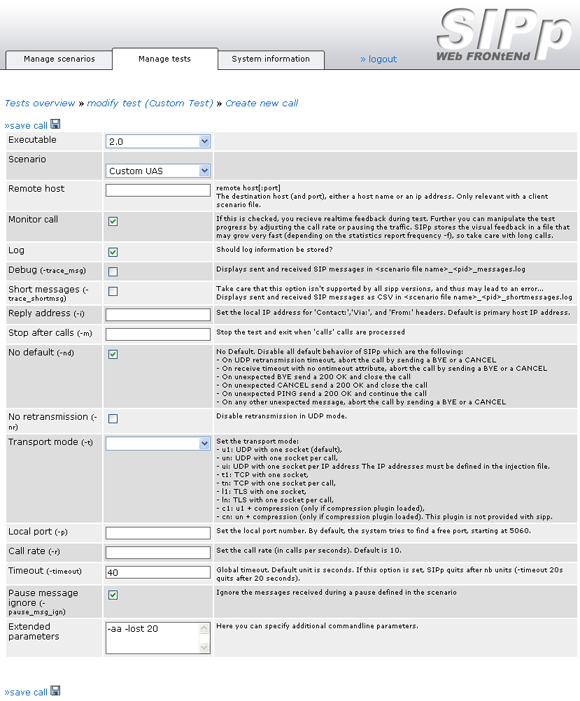
Here the command line parameters to pass to SIPp can be set up (the corresponding parameters are stated in round brackets, e.g., -timeout) or (-m), but first
- choose an Executable (the version of SIPp you want to use, defined in config.ini.php. See section Config file for more details).
- choose a Scenario defined earlier in the Manage scenarios tab (Section Manage scenarios).
- if a client scenario is used, enter a Remote host. This is where SIPp addresses its messages to.
- check the Monitor call checkbox, if during the test execution realtime feedback of the test progress should be displayed. In that case the tester can also influence the test by pausing it, or by adjusting the packet rate (See section
Run a test for more details). - check the Log checkbox, if log files (-trace_err, -trace_logs, -trace_rtt, -trace_stat) should be stored in the database.
If the given configuration options are not enough, the Extended parameters text field can be used to pass any command line parameters to SIPp. The Extended parameters are not evaluated or modified in any way. It is up to the administrator to use a correct syntax. There may be some command line options that do not work, or even cause SIPp to hang (i.e. -bg).
If a parameter is specified in the form and also as extended parameter, the extended parameter has the higher priority, and overwrites the other.
Global parameters (applied to any call) can be defined in the AVP Section of the config.ini.php. These have the lowest priority.
Modify a test / create a new test version
Tests and calls can be modified at any time. If a test has already runs, a crucial modification of the test would mean that test information belonging to these runs is lost, and thus the run is not reproducible anymore. To avoid this, a new version is created automatically.
Simply switch between the versions of a test by clicking the version numbers. A version can even be deleted by using the remove this version link, but then all its runs are lost too.

Duplicate a test
If a test is duplicated using the duplicate test link, the currently displayed version of the test is copied into version 1 of the duplicate. The new name of the duplicate is composed with the original name followed by the word copy. A duplicate initially has no runs.
System information
In the System information tab, the page is split in 3 areas. First a list of currently running SIPp instances is displayed. Then the available free disk space is stated. Finally there is a list with the versions of SIPp that are defined in the config.ini.php file, along with their verbose screens.
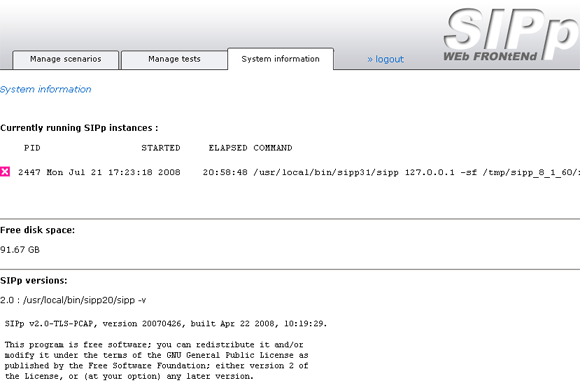
Kill a hanging SIPp instance
An admin can try to kill an instance of SIPp by pressing the corresponding red X button in the list of currently running SIPp instances. Although SIPp runs that are not started through the web frontend are also in the list, they cannot be killed.
Config file
A line in the config file with a leading ; is a comment and has no effect to the configuration.
The configuration file is divided in three sections respectively tagged with
[EXECUTABLES], [AVP], and [CONFIG].
- In the [EXECUTABLES]-section SIPp executables and their versions can be specified. At least one executable is mandatory.
- In the [AVP]-section global command line parameters for SIPp can be specified in form of attribute-value pairs (attribute = value).
I.e. most parameters of SIPp (without the leading -) will be accepted (see sipp -h for more details).
These parameters can be overwritten in each individual call by using the Extended parameters textarea in the web tool. Take care that you only use parameters that work with every version of SIPp you are using with this tool. If a attribute has no value, but is a switch, use TRUE as a value (e.g., aa = TRUE). If a value contains non-alphanumeric characters it needs to be enclosed in double-quotes (").
Parameters not allowed are:
i, m, nd, nr, t, p, r, timeout, pause_msg_ign, v, bind_local, inf, sd, sf, sn, stf, trace_msg, trace_shortmsg, trace_screen, trace_err, linebreak trace_timeout, trace_stat, trace_rtt, trace_logs - In the [CONFIG]-section you will find program specific parameters, like admin password or MySQL-database connection information...
Refer to the config file config.ini.php to get more detailed information about the specific parameters.
User guide
Manage tests
There is a list of available tests in the Manage tests. If there are many tests, it may be useful to sort the tests by clicking one of the column headings.
Run a test
Click on a test to get a more detailed view. There choose a version and click on the run this version link to open the test popup.
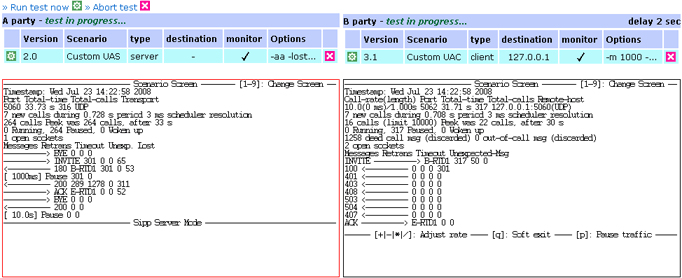
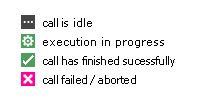
Click on Run test now to begin testing. Both parties start to process their queues. On the left hand side of each call there is a small image showing the actual state of the call.
Key commands
If monitoring is turned on, the test progress can be influenced by using key commands (this is the same as in the command line). First set the focus to the corresponding monitoring screen by clicking on it. When the border of the screen turns red, use the key commands on your keyboard.
- 0-9 to switch between screens
- + , - , * , / to adjust packet rate
- q to soft exit
- p to pause/resume execution
Abort a call / test
Never close the test window without the test finished, because there may reside SIPp processes running on the server. If for some reason a call does not terminate by itself, there are three possibilities to finish the test anyway:
- If the call has monitoring turned on, try to end the call with the key command q (soft exit).
- A call that hangs can be terminated by pressing the red X on its right hand side.
- The whole test can be stopped with the Abort test link at the top of the window.
Runs
After a test has finished, the test window is closed automatically and the created run is displayed. The exit and the std error column may contain important information (roll the mouse over the columns for more details in a tooltip box). Click the grey eye buttons to download the log files created during the test.

It is possible to return to this page, or to another run, any time. Just navigate to the corresponding test in the Manage tests tab, choose the right version and click on a run at the bottom of the page.
Programming guide
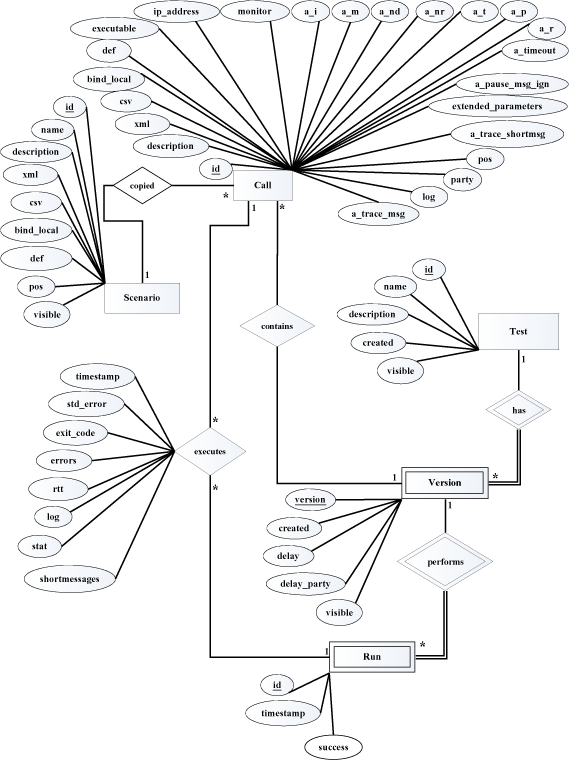
Database (ER Diagram)
Files
- add_call.php is responsible for the add/modify call screen. Adds/modifies calls in the database.
- authentication.php: checks if admin is logged in. It is included everywhere, where admin should have special permissions.
- Call_Data.php: class Call_Data: contains call specific data (process-id, log filenames...) of a currently running call. It has methods to store log files in the database, delete the log files and determine the exit code after execution. When a call is about to be executed, an object of this class is generated and stored in a session variable.
- config.ini.php: configuration file
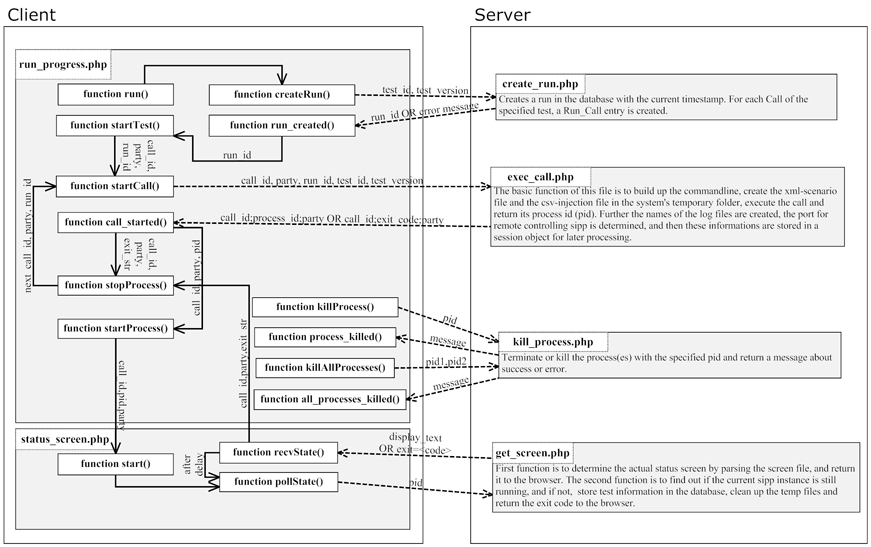
- create_run.php: is called from run_progress.php via ajax. It creates a run in the database with the current timestamp.
- dbHelper.php: is where the SQL happens. For each table in the database, there is a corresponding class that handles database communication.
- db.php: generates the MySQL database connection object.
- exec_call.php: is called from run_progress.php via ajax. The basic function of this file is to build up the command line, create the XML-scenario file and the CSV-injection file in the system's temporary folder, execute the call and return its process id (pid).
- garbagecollector.php: removes all SIPp directories in the system's temp folder that have not been modified for a specific time (defined in config.ini.php). Further all SIPp processes older than a specific time get killed.
- get_screen.php: During execution of a call this file is requested periodically via ajax. Here the actual monitor-screen is extracted from the screen file, and returned to status_screen.php (if monitoring is turned on). Further this file checks if the SIPp process is still running, and if not, it returns exit-code and standard-error to status_screen.php.
- helper.php: just some useful functions.
- index.php: redirect to tests.php.
- info.php: represents the System information tab.
- kill_process.php: is called from run_progress.php via ajax, if the user wants to kill a SIPp process.
- read_config.php: reads the config file in the three arrays $executables, $avp, and $config. Default values are set if necessary, and there is a function getConfig-Parameters that assembles command line parameters from the AVP section.
- run_detail.php: represents the show run page.
- run_progress.php: represents the run test popup. This is where all the ajax happens. Refer to the file itself for detailed information.
- scenario_detail.php: represents the create/modify scenario screen. Inserts or updates scenario data in the database.
- scenarios.php: represents the Manage scenarios tab.
- send_key.php: is called via ajax from status_screen.php when the user presses a key on the keyboard.
- status_screen.php: is displayed in a iframe in run_progress.php during test. Here the status monitor screen of a running SIPp instance is displayed by polling it from the server frequently. Further, keyboard action is sent to send_key.php, that forwards it to the running SIPp instance.
- stop_sipp.php: has a function that tries to stop a running SIPp instance. It takes care that the pid belongs to a SIPp process.
- sys_get_temp_dir.php: provides functions that determine the working directory and the systems temp directory.
- test_detail.php: represents the create/modify test screen.
- tests.php: represents the Manage tests tab.
- view_csv.php: is for downloading CSV files (log files etc.) that are stored in the database.
- view_messages.php: is for downloading the file created by the command line option -trace_messages. The trace_messages file is not stored in the database because it may be very large, but it is left for a short time in the systems temp folder until the garbage collector removes it.
- view_text.php: is for downloading text files (log files etc.) that are stored in the database.
- view_xml.php: is for downloading XML files (scenario files) that are stored in the database.
- /js/ajaxConnection.js: crossbrowser function to create an ajax request object in javascript.
- /js/helper.js: some useful javascript functions.
- /js/run.js: opens a window for a test run.
- /js/tooltip.js: provides functions to display tooltip texts.
- /navigation/pagehead.php: If you want to add a new tab to the navigation, do it here.
- /navigation/register.php: Here the navigation of the webfrontend is created.
Command flow during test process
by Mario SMERITSCHNIG [code/documentation]